Nowadays, iOS app development is becoming a foundation of business growth and innovation. As many especially top-class business decision-makers and owners are using iOS devices worldwide, making an iOS app will open millions of new business possibilities (and opportunities) is quite possible.
In this article, we will disclose an in-depth and step-by-step guide that will show the entire iOS app development process, from the kickoff of your idea to the deployment of a fully functional and user-friendly application. By the end of this, you will be taking charge of creating an App development in iOS without any prior coding experience or for a beginner-level programmer.
Internet Soft, a leading software development company in California offers an exciting service of iOS app development with dedicated iOS developers for providing distinct iOS apps essential for your business.
If you are really curious about this service, you can check with us to hire dedicated iOS developers. For more information on the benefits of hiring iOS developers, call us now.
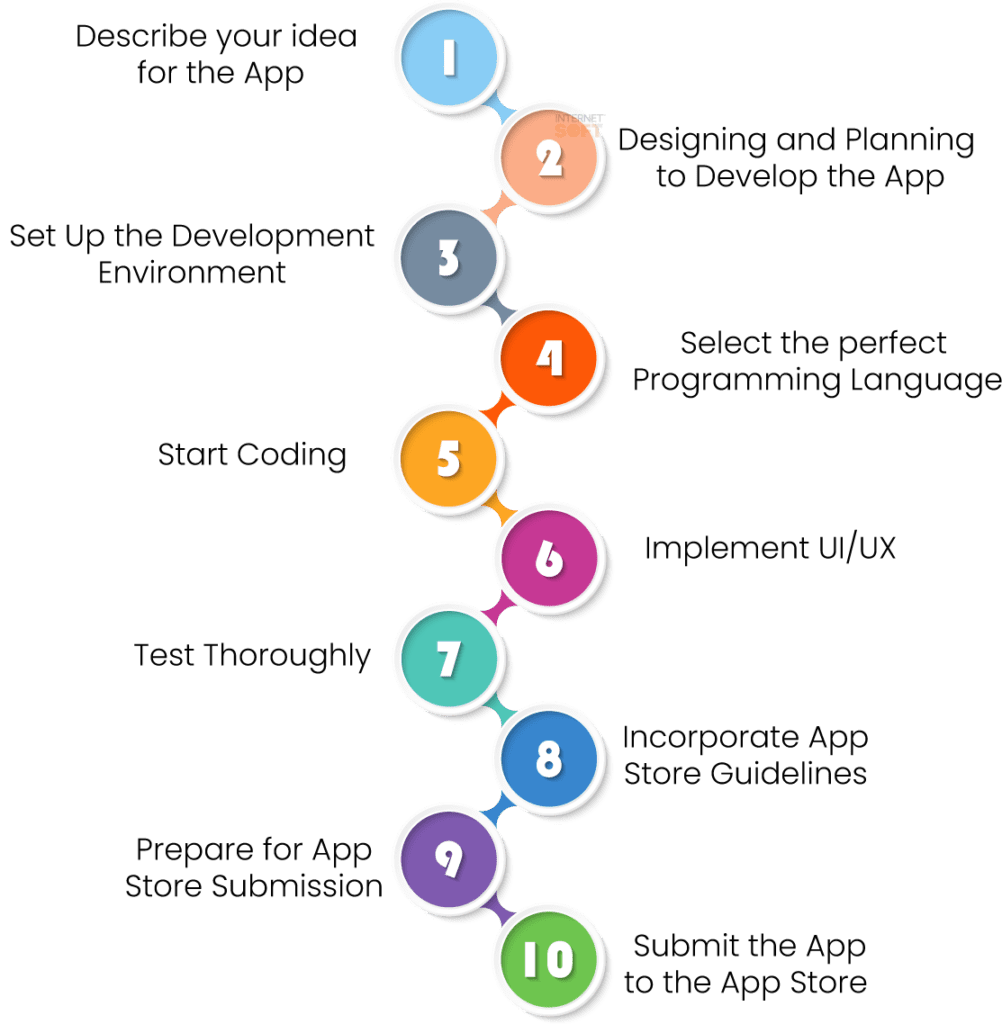
Step 1: Describe your idea for the App
The first step in iOS app development is to describe your app’s concept. Have extensive market research to know existing apps in your selected niche area and trace user needs and pain points. This research will help you structure your iOS app idea and determine the USPs or distinct features of it.
But While brainstorming one has to consider the potential target audience, app objectives, and revenue model. Ask yourself these questions:
- What problem does your app solve, or what value(value-added service) does it give users?
- What’s the target (market)audience, and what are their(priority choices) preferences and audience behaviors?
- How will the app develop revenue through in-app purchases, subscriptions, or advertisements?
Revolutionize your iOS app dreams
Hire iOS developers now and turn your vision into reality!
Step 2: Designing and Planning to Develop the App
With a clear app idea in mind, we can move to start the designing and planning process. We need to develop(or design) wireframes and prototype your app’s user interface (UI) by utilizing tools like Sketch, Figma, or Adobe XD. These visual representations will help us to understand the app’s flow and user interactions much better. For the best results, consider the below points.
- Build an intuitive and aesthetically suitable UI during the design phase that aligns with your brand’s identity.
- Review the overall user experience (UX) to ensure your app is user-friendly & comfortable to navigate.
- Engage with prospective users and collect feedback on the starting designs to make necessary improvements.
The Project plan for the app development must contain deadlines, resource planning with allocations, and expected landmarks or goals.
Step 3: Set Up the Development Environment
To create iOS apps, we need a Mac computer with Xcode, Apple’s integrated development environment (IDE). Xcode is a mandatory tool for iOS app development, as it develops the necessary features & resources to create, test, and debug the app.
In this phase, we will Install Xcode from the Mac App Store and get familiarized with its features and functionalities. Discover the various components of the IDE, like the code editor, Interface Builder, and debugging tools, to streamline your development process.

Step 4: Select the perfect Programming Language
iOS apps can be built using two main programming languages: Swift and Objective-C. Swift was developed by Apple in 2014. Swift has quickly achieved popularity due to its new syntax, enriched performance, with safety features. Swift is good for beginners and most new app development projects.
Also, Objective-C, the old and established language, is still useful for legacy projects, compatible with old iOS versions. If someone has prior experience with Objective-C or needs to work on an ongoing project, this language can be the better choice.
Above all the main thing is that, we need to select the programming language that matches your project’s requirements, team skill sets, and long-term vision.
Step 5: Start Coding
It’s time to code with the environment and selected programming language. Start by implementing the core functionality and features outlined in the project plan. Split the development process into smaller(modular) tasks and handle them one by one. Test the code regularly to know and resolve any bugs or other relative issues that may arise during this development process.
To maintain clean and organized code, follow best practices with design patterns like Model-View-Controller (MVC) or Model-View-ViewModel (MVVM). Also, we can utilize Swift’s powerful features, such as optional and type inference, to write safer and more efficient code.
Step 6: Implement UI/UX
With the back-end functionality in place, it’s time to incorporate the selected UI design with the codebase. Be sure that your app’s UI is visually appealing and in line with the user experience. We need to create an intuitive, user-friendly interface that echoes with your target audience.
Enhance your app’s UI for iOS devices,iPhones, and iPads, by approving responsive design principles. Let us test the app on various screen sizes and orientations to ensure a smooth user experience.
Step 7: Test Thoroughly
In-depth testing is predominant to provide a stable and bug-free app. Before submitting the app to the App Store, we have to conduct complete testing to know and resolve any issues. The testing phase will be as follows:
- Unit Testing: Test single components of your app to ensure they work as required.
- Integration Testing: Confirm the interactions between various app parts to ensure seamless integration.
- User Acceptance Testing (UAT): Engage beta testers or prospective users to collect feedback on usability and complete satisfaction.
Step 8: Incorporate App Store Guidelines
Before adding the app to the Apple App Store, ensure it complies with Apple’s guidelines and policies. Get familiar with the App Store Review & Human Interface Guidelines including app functionality, design, content, and security requirements. Focus mainly on guidelines related to user privacy, data security, and accessibility. Non-compliance will result in app rejection or removal from the App Store.
Step 9: Prepare for App Store Submission
As the App is now fully tested, and compliant with the App Store guidelines, It is time to be ready for the submission process. Collect all the required assets, like app icons, screenshots, and promotional materials. Create an Apple Developer account, and follow the enrollment process in the Apple Developer Program.
Generate the required certificates and profiles for app signing to ensure secure and legitimate distribution. Take the time to design an engaging app description and create a compelling app preview video to allure expected users.
Step 10: Do Addition of the App on the App Store
It’s time to submit the app to the App Store for review. App Store strictly reviews every app submitted on Apple standards and Appstore compliances. We need to submit the iOS App by following the required parameters. Even in case of any feedback, We need to rework the app, its app store description, suitable keywords, app review feedback, etc. to retain and improve the app rankings in the app store.
Step 11: App Launch and Marketing
Once the App is launched it needs to be promoted very well. It needs Marketing of the app. We need to plan a complete marketing strategy to make buzz and lure users. Leverage all social media platforms, content marketing, and app preview videos to display your app’s features and benefits. Develop promotional discounts or join with influencers to boost visibility.
Step 12: Monitor and Update
We need to monitor the app’s performance closely using analytics tools. Collect user feedback via app reviews, customer support, and surveys to identify areas of improvement, and collect insights for future updates. Getting engaged with your user base and responding to their needs will nurture loyalty and enhance user retention.
Regularly release updates with bug fixing, enhance existing features, and give new functionalities. Staying up-to-date with the latest iOS versions and hardware changes is important for app compatibility and to give an optimal user experience.
As an established software development company in California, Internet Soft offers a service to hire iOS developers to create distinctive iOS apps for various enterprises. To know the real benefits of hiring iOS developers, book an appointment with us today!
Wrapping Up
App Store Optimization (ASO) is also important to increase the app’s visibility with ranking and branding value at the App Store. So the right use of keywords, perfect app descriptions with good content, and Good visual quality these factors will increase the app’s visibility chances and ranking in the App Store. The above-discussed steps will enable anyone interested in launching his app in iOS with assured success to launch and help in giving some good marketing tips for the iOS app visibility and ranking. Hire iOS developers for the best iOS development results from Internet Soft now!
Visit Internet Soft for the latest tech trends and insights around AI, ML, Blockchain, along with NeoBanking and timely updates from industry professionals!
Need assistance or have questions? Reach out us at sales@internetsoft.com.


